

How To Do Nail Foil Designs for Fall and Winter
Nail Foil Art
As the weather cools down, it’s time to combine moody fall and winter vibes with exciting textures. Nail foils add a sense of glamour and shine to your nails for an afternoon of apple picking or a cozy night in with your bae. This season, we’ll see everything from earth tones to decorative gold in popular nail designs, so keep reading to get a head start on planning your nails for the coming months.
What Do Nail Foils Do for You?
Nail foils take your designs to another level by applying color, shimmer, and texture. These thin foil sheets stick to your nails to make asymmetrical looks that surprise and add excitement to your latest Russian manicure using gel nail polish.
To make your nail foils stick, you’ll need to follow a special process. But if you do it right, you can combine them with other elements, like different color nail polishes, nail art, glitter, and charms. It’s a quick way to upgrade your manicure and get adventurous with contrasting colors, different foil applications, and hot takes on recent trends. They last about a week, so you can keep discovering new styles all season!
Trendy Nail Foils for Fall and Winter
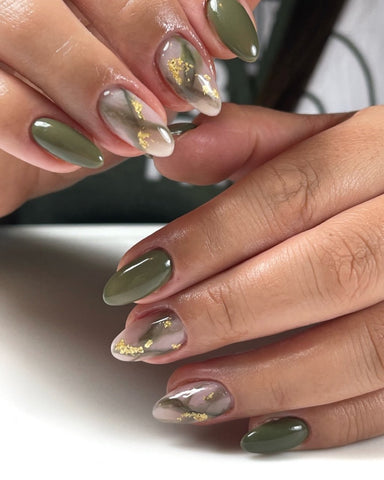
Look to combine earth tone polish colors with contrasting nail foils for autumn and winter. Deep greens, rich browns, and classic black gel polish give your nails a sophisticated, versatile look that you can wear for any occasion, whether to the office or for a night out on the town. Then add your accent of foil to your nails keeping in mind which color foil will pair best with the polish color.
Here are a few ideas to get you started and plan your manicures for the coming seasons.
Glitzy Gold Nail Foils
Gold or silver foil nails add a dazzling touch to your manicure. Brighten your fall earth tones with gold foil nails, or add a touch of silver to solid black nails. These classy additions can complement your jewelry and upgrade basic colors.
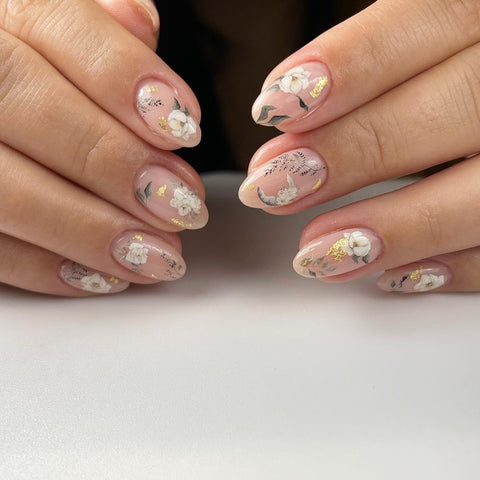
Rose gold foil creates a softer look for cool skin tones. And, if you want to accentuate the gold pattern, try white nails with gold foil for more contrast. You can apply silver and gold foil creatively, for an even or intentionally crackled effect.
Holographic Nails
Holographic foil brings a more adventurous vibe compared to gold and silver. It’s retro with rainbow colors that shine in the sun and have a futuristic feel. This style sticks closer to glazed donut nails with a twist that makes them ideal for events like concerts and parties.
Keep It Classic and Simple
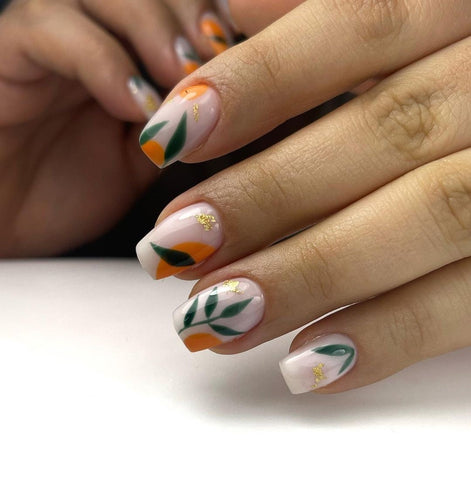
Low-key nails are the theme of the year, from glazed donuts to solid nude colors, and you can use nail foil with these styles as a base. Nail foils add excitement to sheer nude nail polish without getting too flashy. You can also add a pop of color using foils in the same color family.
With red, orange, and green taking center stage this season, gold foil on any of these colors catches the eye while keeping the natural feel. You have plenty of options to play with simple nail looks that won’t bore you.
How To Apply Nail Foils
You can get your foil nails done at the salon, but they’re also easy to do at home. You can explore different textures and application styles to create custom designs. Whether you want to apply foil to cover each nail or a partial foil where no two nails look the same, here’s how to apply nail foil step-by-step.
1. Apply Your Gel Nail Polish Color
Before we get to nail foils, you have to prep your nails. Start by performing a Russian manicure then applying your dehydrator and then a primer. Next is the base coat, then curing, and then applying color (followed by more curing). Those are the steps when using gel nail polish; you can use regular polish, too — just make sure you paint an even coat with your nail brush.
After you’ve applied your color and cured it, add a non-wipe matte top gel to ensure your foils stay in place. Cure that layer, too.
2. Add a Gel Coat
Brush a gel over the areas where you want to apply the foil. If you plan to apply foil to your entire nail, make sure you do a thorough coat. For partial transfers, only apply the gel where you want the foil to stick. Then, cure this layer.
3. Press Your Foil Onto Your Nail
Cut out the amount of foil you want to cover your nail or design area. The amount will vary based on whether you plan to do a partial design or a total nail transfer, and you don’t want to waste it by cutting excessively. It’s also important not to handle the foil too much. Your fingers can make the foil oily, preventing it from sticking to your nail.
Press the foil onto your nail with one firm press to prevent cracking and wrinkling. You might have to rub over the foil with nail tools or dry towelettes for a full transfer. If you mess up, that’s okay — just rub away the foil and reapply. When you’re happy with the look, cure the layer.
4. Bond the Edge of Your Foil
If you’re putting foil over your whole nail, bond the tip. That helps the foil stay on your nail longer by attaching the base gel coat to the top coat. You can skip this step if you’re doing a partial transfer since there’s plenty of space around the design to connect it to the base coat. Cure this layer, too.
5. Finish With Top Gel Coat
To complete your foil manicure, apply a top gel coat and a non-wipe top gel again. Make sure it touches the bonding layer to fully seal the design. Cure it, and admire your work!
Create Your Own Nail Foil Designs
Whether you follow the latest trends or have your own signature style, nail foils shake it up. There’s a foil color for every season, so you have more than enough to carry you through autumn and winter. And while you can get stunning nail looks at the salon, you can also create them at home with the right tools. Try different looks and take design risks to stay inspired, even if you’re stuck inside this winter!